Automotive Hail Damage Inspection Checklist: Where to Start?
TL;DR: A hail damage inspection helps you find hidden dents before they cause problems with your insurance claim.
- Inspect your car in low-angle sunlight to make shallow dents easier to see.
- Check the roof, hood, and trunk first because hail usually hits these areas hardest.
- Look for clustered round dents, damaged paint, cracked glass, and warped reflections.
- Photograph all visible damage before filing your insurance claim.
- Get a professional inspection if you suspect you missed hidden damage.
Another storm rolls through. You peek out your window or front door and check your car in your driveway. Looks great; you’re not worried about it.
The next day on the way to work, the sun is shining, and you catch something at just the right angle on your car’s hood thanks to the sun. There are a dozen dents you didn’t see the day before! Why does this happen?
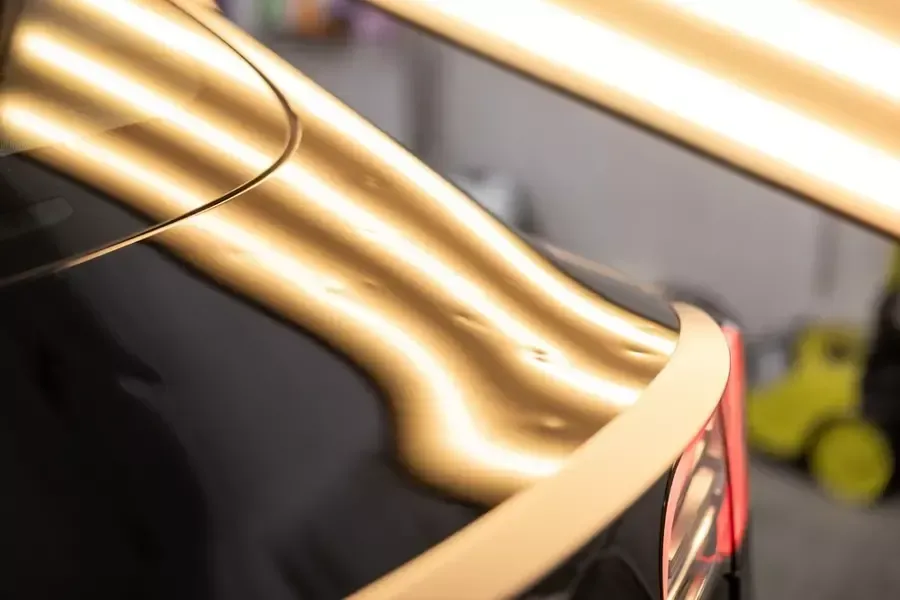
Curved panels, shadow lines (the way light falls across a curve, sometimes referred to as “reflection lines” or “light lines”), or low light can hide hail damage. If you’ve never done a hail inspection, or experienced the frustration of missing it the first time and feeling guilty, don’t.
Once you know how to inspect your car for hail damage, you’ll be able to know exactly what to watch for and never miss it again.
Hail damage is one of the most incredibly easy things to miss. Let’s buckle up, because by the end of this, our team will have you equipped with everything: knowledge, tools, and mindset to tackle your own hail damage inspection like a pro.
How to Identify Hail Damage on a Car?
Hail damage has a very specific signature that separates it from, say, curb dings or door dents. Here’s what to check for:
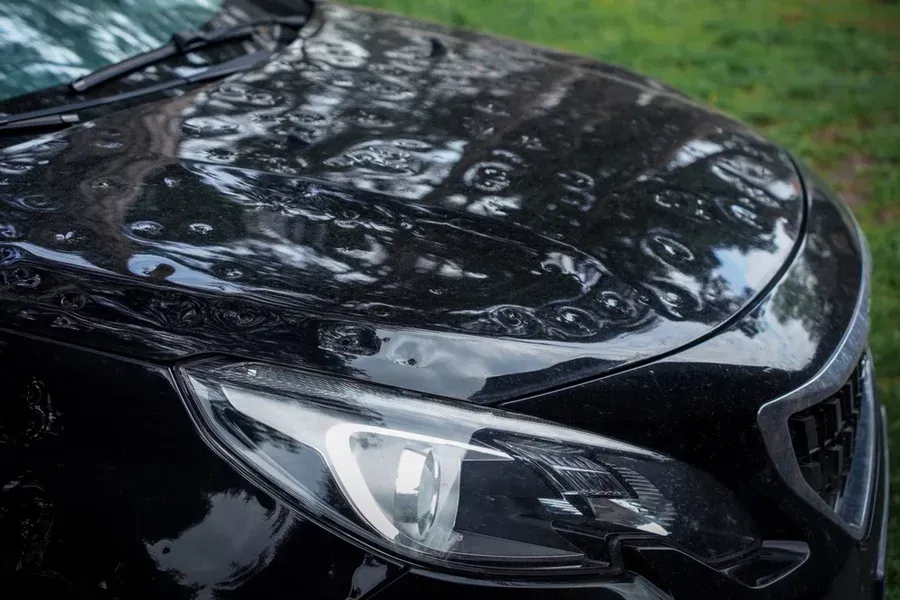
- Small, round dents clustered rather than scattered randomly
- Dents concentrated on the roof, hood, and trunk more than the sides
- Cracked or chipped paint sitting inside a dent, not just around it
- Rippled or wavy reflections when you view a panel at an angle
- Multiple panels affected at once, rather than a single isolated ding
Are you only finding damage on one panel? It may be worth double-checking the others one more time. A single dent from hail is incredibly rare.
Why Spend the Effort on a DIY Checklist?
A rushed glance out your window during a stormy, hail-ridden day can’t tell you everything you need to know. You’ll almost always miss something. Shallow dents also don’t cast shadows unless a light source hits them at the perfect angle. A quick eyeballing or a five-minute inspection in flat lighting will leave you thinking you got lucky when you didn’t.
On top of that, missed dents cost you money during a claim. Insurers pay for what’s documented on the day you file. Noticing dents three weeks later = you’re out of luck. Using a hail damage checklist gives you a documented, repeatable order of operations for every panel, seam, and piece of trim to be added to your first report.
Where to Begin a Hail Damage Checklist: The Car or Finding the Correct Lighting?
Lighting first, before you even glance at a panel. Direct sunlight at a low angle, like early morning or late afternoon, reveals dents that overhead noon light will hide entirely. If natural light isn’t available, hold a flashlight at a raking angle (a low, almost horizontal angle) across the panel you’re inspecting, as it works almost as well.
Parking on a flat surface away from trees and power lines will also help. You want steady footing around the car or vehicle and access to every side.
Do You Work on Horizontal Panels First or Vertical Panels?
Horizontal Panels First
Hail usually falls from above, so gravity gets to decide where the damage lands. Start your checklist with:
- The roof
- Hood
- Trunk lid
These are flat, upward-facing surfaces that will always take the hardest hits. Run your palm across these surfaces while you look. Your hand can pick up many shallow dips your eyes skip over, especially on dark-colored paint. You’re seeking the feeling of small, round indentations, uneven ripples, or spots where the reflection looks warped or wrong.
Check the Vertical Panels Next
You’ve got the flat surfaces covered; time to move on. Next, inspect these vertical panels:
- Doors
- Fenders
- Quarter Panels
Vertical sections like these usually show less damage, since hail strikes them at a shallower angle. But that doesn’t mean wind-driving them sideways won’t leave marks there.
Stand so the daylight rakes across the panel from the side rather than facing you head-on. Vertical panels catch angled light more easily than the roof or hood, so you often don't need the flashlight here, but the same shadow-and-reflection principle still applies.
Then Check Glass, Trim, and Lights
Your hail damage car inspection is almost there after the body panels. Windshields and windows could develop small chips or hairline cracks. Easy to miss these along the edges where stress cracks tend to form.
Last, but never least, inspect:
- On your windshield and side windows, look for chips, cracks, or bullseye marks (a type of glass chip that looks like the bullseye from a dartboard: a dark cone-line shaped impact.)
- Headlight and taillight lenses for cracks or cloudy impact spots
- Side mirrors for cracking housing or loose mounting
- Plastic trim and moldings; they crack easier than metal
- or antenna base for small dings
Trim pieces are often overlooked because they blend into the surrounding panel. A cracked molding won’t cost you as much as a dented hood, but it still belongs on your checklist.

Should You Document Everything as You Go?
Clear, in-focus photos turn your DIY inspection into evidence. Take a wide shot of each panel first, then follow with close-ups of every dent, chip, or crack you find. Shoot from several angles, since a dent that’s hard to see straight-on will show much clearly from the side.
Keep a running note of which panels have damage and roughly how many dents you’ve counted on each. You don’t need exact numbers. You need as many details as possible for a shop or adjuster to match your findings later.
When Should I Turn to A Professional?
DIY checklists are great for learning and doing, but some damage only shows under specialized lighting. Professional shops that focus on hail repair will bring your vehicle indoors and might use fluorescent or newer LED panels to catch every dent that can’t always be caught with the naked eye.
With an expert eye, they can help you decide whether paintless dent repair will work or whether the panel needs traditional bodywork instead.
Not a knock on you or your vision. It’s just a different, more specific tool for catching all the damage sunlight, flashlights, and human vision simply can’t.
Think You Need to Bring in that Professional?
Running through this checklist after a hailstorm means you don’t accidentally miss, or skip a panel now—only to have to explain or fight your insurance company later on why ‘new’ damage ‘just showed up.’ You can catch this before it becomes an issue.
Second-guessing what you found? Completely normal, and we feel you. You’re working with your own eyes and whatever light you’ve got, and while much better than a quick glance, it can’t quite match what a trained technician will.
A Dent Clinic hail damage inspection runs your car under lighting built to expose what your driveway walk-around can't, and tells you exactly what's there, panel by panel, so nothing gets left off the report your insurance company sees.
You catch damage early,
let our team handle the rest.
Related Articles